
Multi-Cloud Deployment for Elixir & Phoenix with MRSK
In my last post I showed how to cluster globally distributed Elixir nodes together over Tailscale. In this article I’m going to show how to use MRSK, a new open source deployment tool, to deploy a Phoenix application to multiple clouds.
What is MRSK?
MRSK is a deployment too that enables you to deploy web apps anywhere from bare metal to cloud VMs using Docker with zero downtime. It was built for Rails applications, but works with any type of web app that can be containerized with Docker.
If you come from Rails background, you might find this analogy helpful
MRSK basically is Capistrano for Containers, without the need to carefully prepare servers in advance.
This 20 minute introductory video is worth a watch to fully understand how MRSK works. To install MRSK globally on your development machine run gem install mrsk (assumes you have ruby installed).
Going solo
Despite promises of multi-cloud, I think it is best to start out deploying our Phoenix app to a single host so we can get familiar with MRSK. It could also be really useful if you just wanted to use MRSK to stick something up on a host to show it off publicly.
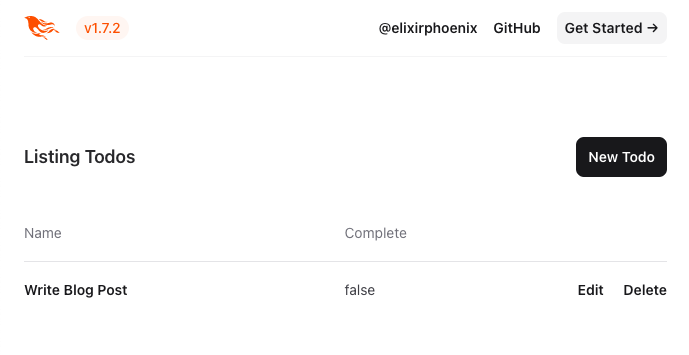
Let’s create a Phoenix application, add a LiveView for managing ToDo’s and prepare it for a release using Docker.
mix phx.new hello
cd hello
mix phx.gen.live Todos Todo todos name:string complete:boolean
mix phx.gen.release --docker
The only change we need to make the default Dockerfile is to expose the port that MRSK expects to be declared. The default port is 3000 so we’ll use that.
+ EXPOSE 3000
CMD ["/app/bin/server"]
Now we will configure MRSK to perform a remote build of our Phoenix application, upload the Docker image to GitHub Container Registry, set up postgres and deploy the application.
I’m choosing to do all this on the same host, but you can spread them out on different hosts if you prefer.
Let’s assume you’ve booted a single server ready to deploy to and you’re able to SSH into the server as root@<ip-address>. This is the only requirement for MRSK and you can configure a different user if you need to.
You can run mrsk init in the root of your Phoenix application and it will create a sample ./config/deploy.yml file. We can replace the contents of that file with our custom setup for Phoenix, replacing your <username> and <ip-address>.
service: hello

image: <username>/hello

servers:
  - <ip-address>

registry:
  server: ghcr.io
  username: <username>
  password:
    - MRSK_REGISTRY_PASSWORD

env:
  clear:
    PORT: 3000
  secret:
    - SECRET_KEY_BASE
    - DATABASE_URL

builder:
  remote:
    arch: amd64
    host: ssh://root@<ip-address>

healthcheck:
  path: /

accessories:
  postgres:
    image: postgres:latest
    host: <ip-address>
    port: 5432
    env:
      secret:
        - POSTGRES_PASSWORD
        - POSTGRES_DB
    volumes:
      - /var/lib/postgresql/data:/var/lib/postgresql/data
You’ll also need to add your MRSK_REGISTRY_PASSWORD, SECRET_KEY_BASE, DATABASE_URL, POSTGRES_PASSWORD and POSTGRES_DB environment variables to a local .env file which will be picked up by MRSK.
Since we’re using LiveView for the ToDo’s we’ll also need to update the check_origin config for the HelloWeb.Endpoint in config/runtime.exs:
  secret_key_base: secret_key_base,
+ check_origin: ["http://<ip-address>"]
Now we’re ready to deploy.
mrsk deploy
mrsk accessory boot postgres
mrsk app exec "bin/hello eval 'Hello.Release.migrate'"
You should now have your service deployed and accessible at http://<ip-address>/todos. If you’re planning on keeping this one running then don’t forget to lock down your firewall.
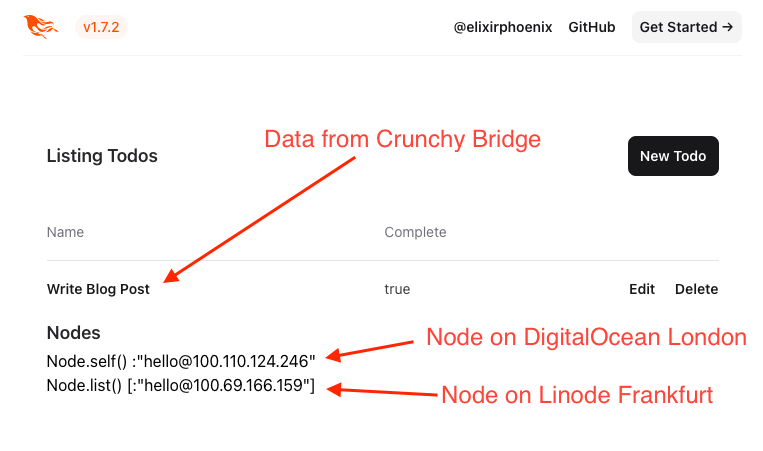
Multi-cloud Database
MRSK is cloud agnostic, so we can deploy the application to another host in another cloud simply by adding the IP address of the server to the list of servers in deploy.yml and re-running mrsk deploy. However, running the application over two clouds brings new challenges, for example accesing the database securely.
In this example I’m going to be using Crunchy Bridge fully managed Postgres, which I’ve been using for a while as an alternative to Heroku Postgres and am very happy with.
In my previous article I showed how you can connect a cluster for the Elixir nodes over Tailscale. Crunchy Bridge also supports connecting your database to your Tailscale network, so they’ll all be able to communicate with each other securely.

Above you can see I’ve spun up a Cruncy Bridge hobby instance in London, and if you navigate to Networking > Tailscale and enter an Auth Key it will connect to your Tailscale network.
Note: It is sometimes a bit misleading and shows an error saying you’re already connected to the network. I’ve found that you just need to wait for a while and it will connect fine.
You should now see your database in Tailscale, get the IP address and update your DATABASE_URL env var to point to your new database.

We’ll need to make a couple of changes to the Phoenix application config to connect to the database. Firstly in config/runtime.exs we need to ensure ssl: true is uncommented:
config :hello, Hello.Repo,
    ssl: true,
and in mix.exs we need to add :ssl to extra_application:
extra_applications: [:logger, :runtime_tools, :ssl]
in lib/hello/release.ex we need to ensure that the :ssl application is started:
defp load_app do
+  Application.ensure_all_started(:ssl)
   Application.load(@app)
end
Multi-cloud Phoenix
To make all of this work for the Phoenix application we need to make a couple of changes to the application and the deployment config.
We need to add Tailscale to our Dockerfile by adding a new build step:
RUN mix release

+ FROM ${RUNNER_IMAGE} as tailscale
+ RUN apt-get update -y && apt-get install -y wget
+ WORKDIR /app
+ ENV TSFILE=tailscale_1.38.1_amd64.tgz
+ RUN wget https://pkgs.tailscale.com/stable/${TSFILE} && tar xzf ${TSFILE} --strip-components=1
And then update our runner image to copy the Tailscale binaries across:
COPY --from=builder /app/_build/${MIX_ENV}/rel/hello ./
+ COPY --from=tailscale /app/tailscaled /app/tailscaled
+ COPY --from=tailscale /app/tailscale /app/tailscale
In our config/runtime.exs file we’ll need to configure the Tailscale cluster that we want to connect to (see my previous post for more details):
service_name = System.get_env("MRSK_CONTAINER_NAME")

if service_name do
  config :libcluster,
    debug: true,
    topologies: [
      tailscale: [
        strategy: Cluster.Strategy.Tailscale,
        config: [
          authkey: "tskey-api-XXX-YYY-ZZZ",
          tailnet: "example.com",
          hostname: service_name,
          appname: "hello"
        ]
      ]
    ]
end
We look for the MRSK_CONTAINER_NAME env variable which MRSK provides when starting the container, which is unique to the version of the application you’re deploying. This ensures we only connect nodes that are running the same version of the application.
We’ll need to create rel/env.sh.eex to configure the Elixir node name:
#!/bin/sh

ip=$([ -n "${MRSK_CONTAINER_NAME%%healthcheck*}" ] && tailscale ip --4 || hostname -i)
export RELEASE_DISTRIBUTION=name
export RELEASE_NODE=<%= @release.name %>@$ip
Here we’re checking if the MRSK_CONTAINER_NAME starts with healthcheck and if it doesn’t we’ll use the Tailscale IP address for the node name otherwise we’ll use the container IP address.
When MRSK performs a deployment it spins up a healthcheck instance of the application and checks it responds correctly before performing the upgrade. We don’t really want this healthcheck node to connect to our cluster.
So that we can run Tailscale as root, we’ll need to remove out the USER nobody statement in the Dockerfile (we’ll still run the app as nobody in the startup script):
- USER nobody
We similarly need to update our release start script in rel/overlays/bin/server to only run Tailscale if it isn’t the healthcheck instance:
#!/bin/sh
cd -P -- "$(dirname -- "$0")"
if [ -n "${MRSK_CONTAINER_NAME%%healthcheck*}" ]
then
        /app/tailscaled &
        /app/tailscale up --authkey=${TAILSCALE_AUTHKEY} --hostname=${MRSK_CONTAINER_NAME}
fi
su - nobody
PHX_SERVER=true exec ./hello start
If we’re connecting to the Tailscale network then we use the MRSK_CONTAINER_NAME to ensure these versions of these nodes are clustered together correctly.
Finally our config/deploy.yml becomes
service: hello

image: <username>/hello

servers:
  web:
    hosts:
      - <ip-address-1>
      - <ip-address-2>
    options:
      cap-add: NET_ADMIN
      device: /dev/net/tun

registry:
  server: ghcr.io
  username: <username>
  password:
    - MRSK_REGISTRY_PASSWORD

env:
  clear:
    PORT: 3000
  secret:
    - SECRET_KEY_BASE
    - DATABASE_URL
    - TAILSCALE_AUTHKEY

builder:
  remote:
    arch: amd64
    host: ssh://root@<ip-address-1>

healthcheck:
  path: /
We’ve added some extra capabilities to the container running the application so that Tailscale can work properly and we’re passing in the TAILSCALE_AUTHKEY to use when starting the container. Additionally we’ve removed the accessories section as we’re not going to run Postgres via MRSK more.
Now we’re ready to perform the final deployment:
mrsk deployWe’re now running the Phoenix application on multiple clouds, connecting to each other and the database instance securely over Tailscale!
Further considerations
We have the application running now on different cloud providers, but in production we’d need some way of directing traffic to them both. One approach would be to use Cloudflare in front of your app which would provide SSL termination and load balancing.
If you wanted to deploy to different cloud providers across multiple continents then latency to the database could become an issue. Fly.io have some innovative solutions there that could be adapted to work in this scenario and I’m excited to explore Electric SQL as well as demonstrated in Lars’ YouTube Video.